
Hi girls!
How's your day?
Hope it's fabulous!
Here I wanna share my DIY Project that I made recently. Actually, back in the days when I need a palette of my single eyeshadow collection, it's just so hard ti find. And when I found the one I need, the price is just to overwhelmed for me. So, I made this project to fulfill my need in much affordable and FUN way! :D
I always wanted my own a Z Palette, you know the one with a magnetic sheet so we can place our own eyeshadow or blush of choice. But, the price.. -_-" oh well. >,<"
So, this Palette maybe inspired by the infamous Z Palette with my own twist.

Let's get started!

Here's how I did :
1. First, the tools that you'll gonna need are :
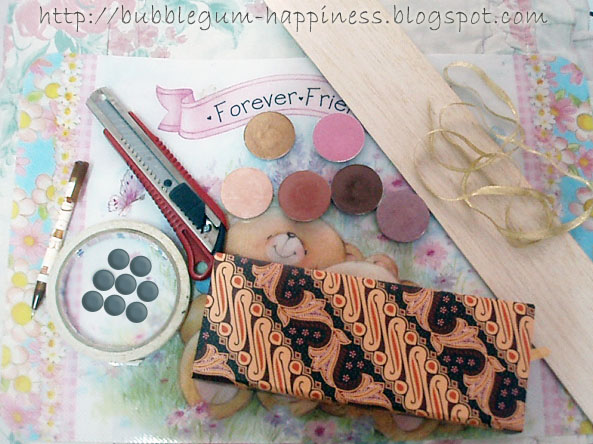
- Batik Magnetic Pencil Case. (while I was debating to make it's case from the scratch, I found this awesome Batik pencil case for a very good price! I bet you could find any type of pencil case in other bookstores as well :D)
- Balsa Wood. or any type of constructive material as board layer to the eyeshadow pan. (I'm using balsa as I had it at home)
- Magnets. (choosing this instead of a magnetic sheet because it's way more cheaper! :D As for choosing magnets that we'll need, the thinner the better!)
- Your eyeshadow or blush or bronzer or other depoted pan of choice.
- Double Tape or Glue.
- Cutter.
- Ruler.
- Cutting Mat.
- Pencil or Pen.
- Ribbon.
- And you're good to go! :D
FYI : Batik Magnetic Pencil Case that I was talking earlier already has a magnetic closure in it. Mine got from Gramedia Bookstore for IDR. 13000 rupiahs >> $ 1.30 US Dollars!! Brand : KIKY. They have lots of different batik pattern as well :D


2. Then, measure the inner size of pencil case so we'll get the length and width. As I'm measuring the height, lucky enough.. we'll able to stack 2 layers of board!

Cut the board (balsa wood) according to our measurement. Twice as much.


FYI : If you want, you can add little note so you won't forget the name of the eyeshadow.


3. Moving on, we'll gonna make marks to place magnets into each of the board. To make it simple, just randomly place the pan into the cutting board to know how many pans could fit. In this case, I could fit 4 pans in each board. So, I'll just divide the space with some measurements and make circles as the place of magnets.
FYI : You can carve the circle into a depth of the magnets. Just to make it a more polish looking :D

4. After that all done, make a simple statement in each board, like so :

Here in the left, I cut a ribbon. This function as a lifter of a board.
For the right board, I cut 2mm board as a second layer height (see picture below)

So far, we'll get something like this :

2 stack of 2mm board.
As for picturize, it's function as the second layer height.

5. Almost done! Now, we can stick the opposite magnets to the eyeshadow pan with double tape or glue.

For attachment magnet-board I'm using glue, because it's the most secure.
For attachment magnet-pan I'm using double tape, so I could un-attached them easily.

And you'll pretty much have something like this :

First layer :
Plain board without additional stack.

The one with the ribbon on the right side.

The ribbon function as a lifter to the board.

Second layer :
Additional stack board on the second layer.
Place it on top.
And there you have it!


Magnetic Batik Eyeshadow Palette

And if you're wondering, this what I keep all of my PAC single eyeshadow.
Once I already reviewed and swatched in my previous post --> Overview PAC Eyeshadow, Blush On and Brush Cleanser
***
Actually, in making this palette, there are lots and lots possibilities.
You can either make one from an old pencil case that you barely use >> Wrap with a cute gift paper to make it look like new again... Or, you can use a cardboard that scattered at home >> Recycling is always a good thing!
Well, the possibilities is endless.
You can even save more money for sure, by just recycling what you already had.
This project cost me not more than IDR. 20000 rupiahs >> $ 2US Dollars!
Being inspired what makes you creative!
Thanks for reading this post!
I hope you inspired! :)
Good day all!
Smile :)
My previous DIY Project --> DIY : Surviving Your Cracked Blush
keren ce paletnya.. ideny menarik :D
ReplyDeletepurplelyhazelly.blogspot.com
ehehe. thx for your comment, dear :)
Deletewah kerenn ^^ nice post
ReplyDeletehttp://xiaoveeworld.blogspot.com
thx vee! :D yey!
Deletenice~ thanks for sharing the tutorial ^^
ReplyDeleteyou're very welcome, sha! :D
Deletewaa kreatifnya.. hehehe thank you :)
ReplyDeletesama2 dear. i got inspired by other creative people as well :D
Deletekreatif banget ^^ nice idea :)
ReplyDeletehttp://wind-atree.blogspot.com/
thank you :)
Deletecreative skaleee...
ReplyDeleteehehe thx dear :)
Delete